How do you temper chocolate?
How many times has doubt crept into your mind while standing before a pot of melted chocolate, and you wonder why it isn’t as smooth and shiny as in the magazine photos? Or why, when adding cream, does it get all lumpy?
Like bread, you only need a few ingredients to make chocolate…but, again, it’s an art to work on it! With Easter on the horizon, Mamie will share her knowledge on how to make a perfect chocolate that will be a definite success.
Whether you are an amateur in the art of pastry or a true professional like Mamie, it just so happens that chocolate is an ingredient that shows up a lot in your recipe books. Most of the time, it is not very important that the chocolate look perfect since it will be incorporated into a cake or a mousse. However, if you would like to make chocolate eggs or any other chocolate creation, it is essential to know the basics of tempering.
Chocolate
Most chocolate are made up of a cocoa paste (percentages vary), cocoa butter, and sugar. Dark chocolate is composed of these 3 ingredients. Powdered milk is added to this mixture to produce milk chocolate. This gives the chocolate a mildest flavor and lightens the color. As for white chocolate, it is made up of only cocoa butter, sugar, and powdered milk, so there is no cocoa paste in it.

What does it mean temper chocolate and why is it important?
Tempering chocolate consists in crystallizing the cocoa butter contained in it to give it a more stable form, thus making it easier to work.
Simply put, when tempering, you:
- Destroy all the crystals by heating.
- Force only the creation of good crystals by letting the chocolate cool.
- Bring the chocolate back up to a working temperature without destroying the good crystals.
This step allows it to reach an ideal working temperature.
By doing this, your chocolate will have a nice sheen and be perfectly crisp.
Without following these steps, it will most likely come out soft and marbled. When this happens, it’s a sure sign that the cocoa butter did not totally incorporate and is coming out in spots (traces of white). This does not mean that your chocolate is moldy.
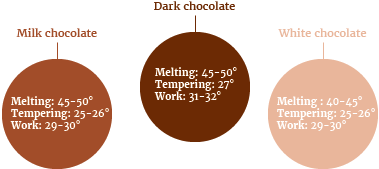
Difference in temperature curves according to the chocolate
Chocolate is not necessarily composed of the exact same ingredients, so the crystallization curve changes according to the “color.” No worries, most of the time this information is indicated on the packaging.
As you can see, temperatures should be observed to the nearest degree, so you will need a thermometer (quality probe or laser).
Example of tempering milk chocolate using a bain-marie
Place the chocolate in a bain-marie and melt it, stirring regularly, until it reaches a temperature of 45-50°C. Once all the crystals are melted, it is possible to start tempering.
Take it off the heat and let it cool (continue stirring) until it reaches 25-26°C.
Stir every 30 to 60 seconds and control the temperature regularly. This step depends a lot on the volume of the melted chocolate and the temperature in the room, and could take up to ten minutes. After a few minutes, you will see the chocolate start to solidify on the sides of the bowl or on your spatula.
Once it has cooled, you can put it back in the bain-marie for a few minutes, until it reaches its crystallization temperature of 29-30°C. Now it is ready to be worked.
MAMIE’S TIP
Chocolate can be stored for up to a year without losing its qualities if certain rules are followed. Store it preferably in a cupboard away from humidity, light, and temperature fluctuations.
How to keep a tempered chocolate at the right temperature
Unlike professional chocolatiers, it is rare for the average person to have a chocolate tempering machine at home. So, Mamie has a couple tips for you to keep your chocolate at working temperature.
- Bain-marie: you will have to constantly keep a close eye on the temperature of your chocolate when using a bain-marie. Be careful, this method heats the container, and not the chocolate directly; with the conductivity of the container, the chocolate may continue to heat and unfortunately pass 30°C. If that happens, you will have to start the tempering process over, so stay focused.
- Hair dryer: a technique that is regularly used, since, unlike the bain-marie, it heats the chocolate directly and it is easier to measure the amount of heat being applied.

Now that tempering chocolate is no longer a secret to you, Mamie has a few pairing suggestions for your own homemade chocolate bars.
- Marshmallows + malted milk balls
- ChocoRocks + crepes dentelle
- Flowers + honey
- Maple syrup + pretzels
- Rice, puffed quinoa or wheat + salted caramel
- Colored jujubes + peanut butter
- Butter cookies + flower of salt
- Candied lemon + poppy seeds
- Walnut + raisin
- Dried cranberry + pumpkin seeds + coconut
Be careful if you want to conserve your chocolate bars, it is not advisable to incorporate ingredients that hold water like fresh fruit or flowers; this will make your bar go bad in just a few days’ time.
MAMIE’S RECIPE
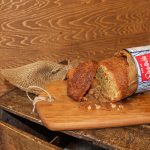
Milk, cereal and chocolate bar
Ingredients – for 3 bar
– 1 cup white chocolate
– 2 teaspoons puffed brown rice
– 2 teaspoons puffed quinoa
– 2 teaspoons rye flakes
– 2 teaspoons rolled oats
– 1 cup milk chocolate
Preparation
Slowly heat, in a bain-marie, the white chocolate (careful, white chocolate is difficult to work). Add the cereals.
Pour the mix into financier molds. Leave in the fridge to harden.
When the bars are hard, take them out of the molds.
Slowly melt the milk chocolate.
Using a basting brush, smear the chocolate on the bars and put them back into the fridge to harden.
If you want a nice smooth outer layer, apply a second layer of milk chocolate, but this time using a small spatula.
Keep refrigerated.